

Page History
...
- Go to the current TntMPD page on mygcm. If you aren't logged in to mygcm already it will take you to the login page first.
https://www.gcmapp.net/mygcm/tntmpd/ - Click on the “TntMPD DataSync File” button to download your personal GCM TntMPD DataSync file. This file is created the moment you click the button and is a personalized data file for you. It will always have the most up to date data on gifts and donors that GCM has.
- Before we do the import, TntMPD allows you to setup automatic tasks for newly inputted data. We do not recommend allowing automatic tasks for your first import. If you do not turn this off, TntMPD will create tasks for all gifts you've ever received. This could create thousands of tasks related to the donors and gifts you will be importing from GCM. If you specifically want to have tasks created for all your GCM imported gifts, then skip to step 4. If however, you would not like to have tasks created for all your GCM imported gifts, you can temporarily disable automatic task creation in TntMPD as follows:
Select Tools in the top menu bar, and click on “Options” [Figure 1].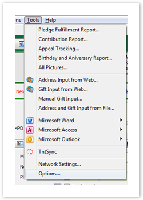
Figure 1 – Tools > Options
In the Options dialog, select the “Gifts” tag and uncheck the “Enable Automatic Actions for New Gifts” option [Figure a22].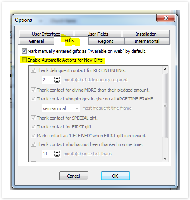
Figure a2 2 – Automatic Actions for New Gifts - Let's import the file! If your TntMPD installation was associated with .tntmpd file types, you can simply double click the downloaded file. Otherwise, in the TntMPD program, click on Tools (in the top menu bar) and select “Address and Gift Import from File,” and browse to your downloaded file [Figure a33].
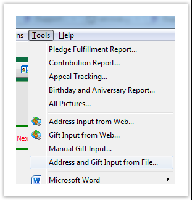
Figure a3 3 – Address and Gift Input from File - You might be prompted to find the matching country from a drop down. Select the correct option and click “OK” [Figure a44].
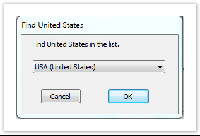
Figure a4 4 – Find Country Window - TntMPD will analyze the DataSync file and present you with a summary view [Figure a55] which highlights the number of contacts that will be added to your TntMPD database, the gifts associated with those contacts, the total amount of those gifts, and the dates of the oldest and most recent gifts.
To sync GCM data with your existing data, make sure you check the “Try to match new accounts with existing contacts” option. Click "Next" to dive in!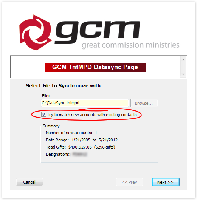
Figure a5 5 – DataSync Summary
Those Tricky Donors
After clicking “Next” on the previous window, TntMPD will present you with a screen to try and match the GCM contact with your existing contacts. You will be presented with the screen for each record in your GCM DataSync file, so this is a lengthy process, but you only have to do it once!
Warning  Now, let's pause here a minute, because this is the tricky part. The way GCM records donors is legally tied in to the name by which they donated. Here are a few different scenarios that can cause issues:
- With a married couple
- The husband might mail a check with just his name on it, and later the wife mails a check with just her name on it. These are two distinct donors according to GCM.
- A wife may have checks labeled "Jane and John Doe" while a husband's checks may say "John and Jane Doe". These are two distinct donors according to GCM.
- One member of the couple may have died, or the couple may not be divorced. You may see these donors as "John and Jane Doe" and "Jane Doe". These are two distinct donors according to GCM.
- With a Business
- If a donor gives through their business, GCM will have their business as a donor. If they also give personally it is considered a separate donor.
The DataSync will prompt you for each donor that GCM has recorded. The point in mentioning this is that many people would have these related donors as a single contact in TntMPD. It is up to you to decide if you want the contacts listed separately (like GCM) or if you want to combine them into a single TntMPD contact. You can do it either way, but you need to remember that if you combine them in TntMPD, they will not match what you see on staffnet. You might ask your MTD coach what they think you should do. TntMPD will show you that their are multiple donors associated with a single TntMPD contact (you'll see this at toward the end of these instructions). If, however, you would like to have everything identical to GCM's records, you should head to http://www.gcmstaff.net and go to MTD > Donors. From the donors page select "All Dates" in the "By Giving" drop down box. This will then give you a list of all donors who have ever given to the account you are responsible for. This list will match the list in the DataSync file, so you can use it as a guide when TntMPD prompts you for each donor individually. Without it you may not realize that you are combining donors into a single contact until later. There is no way to reverse this process. Once you have matched a GCM donor to a TntMPD contact the effect is permanent. Again, there is no way to reverse this process, except by restoring a backup of your TntMPD database from before this initial DataSync and starting the whole process all over again. This is definitely a case of "measure twice, cut once". You might ask your MTD coach what they think you should do.Ok, moving on. After you clicked "Next" a while back on the DataSync summary window a new window pops up. This will actually be one of two windows, either the "Confirm Match" window or the "Find [Contact]" window. [Figure 6a and 6b]. The "Confirm Match" window will contain a list of contacts that have information (name, address, etc) similar to the new contact. If the contact already exists, then select the correct match and press the “Yes” button. Otherwise, click on “No Match,” and TntMPD will add them as a new contact in the next step. If TntMPD cannot find a close match, it will present you with the "Find [Contact]" window showing a full list of your contacts to choose from. If there is not a match click "No Match" and TntMPD will add them as a new contact in the next step.
Section Column width 50% 
Figure 6a – Confirm Match Window
Column width 50% 
Figure 6b - Find "Donor" Window
- With a married couple
- When matching donors to contacts is complete, you will have the opportunity to add the Donors you selected "No Match" to earlier as contacts in TntMPD. By default, all contacts in the DataSync file will be imported. Click “Next” to add all your selected donors to your contact list.
...