

For assistance, problems or questions, please email us.
Page History
Directors Site Information & Instructions
In order to have access to the director’s site the director will be marked as Program Director or Event Administrator in the system. Assignment of the name Program Director will be done automatically by the GCM Summer Program Coordinator as soon as your EVENT SET UP FORM has been received. In order to give access to the director’s site to other administrators helping with your program, the official Program Director, as noted on the EVENT SET UP FORM agreement must request others to be set up with access privileges.
...
Participants will be listed as Regular Attendees and will only have access to their own application. The participants should be able to view what you can view for their own application and also be able to delete and upload forms.
Accessing the site
- To Log into the Directors site you will need to log into www.myGCM.org with your GCMID and password.
- Scroll over the “Events” tab, you should see in the drop down “Administration”. Click on “Administration”

- Click on the summer program that you are logging into.

General Information
Once you have logged into the Administration section and your event, as a Director you should see a list of participants with the following information.
- Name
- Application Status
- Participation Type
- Date Registered
- Information about Application Items Received
- Resend Tools for Reference Forms
- View File for Form Received
- Delete option for Form Received
- Upload Feature
- Fees and Payment Information including Past Due, Due, Balance, Payments made, and Total fees
Contact Information and Sorting
If you are interested in viewing contact information without viewing the participant’s application, please click the Contact Info box located on the left side of the page near the top of the page. All of the participants will then be listed with their contact info. If you then uncheck the App Info box you will then see all the names listed without seeing their Application Items Received box. (Shown Below). The separator simply removes the line between the participants names for an aesthetic preference.
...
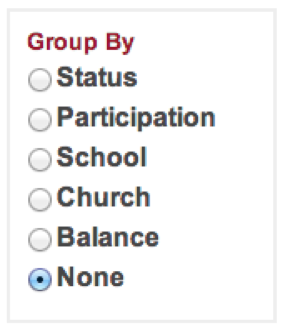
At the top left of the page you will also see the option to group the participants in a variety of ways including by status, school, church, balance, or last name.
Status Tracking
The different statuses are listed below.
...
You can also type a specific status or participation to view all applications listed under that status or participation. (Same feature as the GROUP BY status or participation on the left side of your screen). The participation feature is helpful to divide up the viewing of participants from program staff, event administrators, etc. All of those participation groups that are accepted will be listed under the same status (registered).

Director's Tools
**Only those with access privileges of Directors and Event Administrators will be able to see the Directors Tools discussed below and be able to delete and upload reference forms.
Export Data
At the bottom left of the page you will also see the option to Export Data. It will download an excel spreadsheet with information listed about the participant that you can then rearrange or cut and paste, etc. to customize into an excel sheet that shows the information you want to view for multiple participants. This is a great tool for viewing student payments and fees for collections. Or for adding up your total registration ($25, $50, $75) fees.

You should also see the “Director s Tools” at the bottom left next to each person for Viewing their filled out application and updating their status. (2 examples below)


Directors Tools for Application Processing
View Application – Click here to View Application, print them, or read through a completed application. All application pieces that are submitted electronically will be viewable here.
...
| Excerpt Include | ||||
|---|---|---|---|---|
|